Christmas PFP
Editing methods
Santa Hat Sticker vs AI Editing Which Fits Your Photo?
Compare a Santa hat sticker with an AI photo edit from the same source. See what changes, what stays fixed and when a separate layer makes sense.
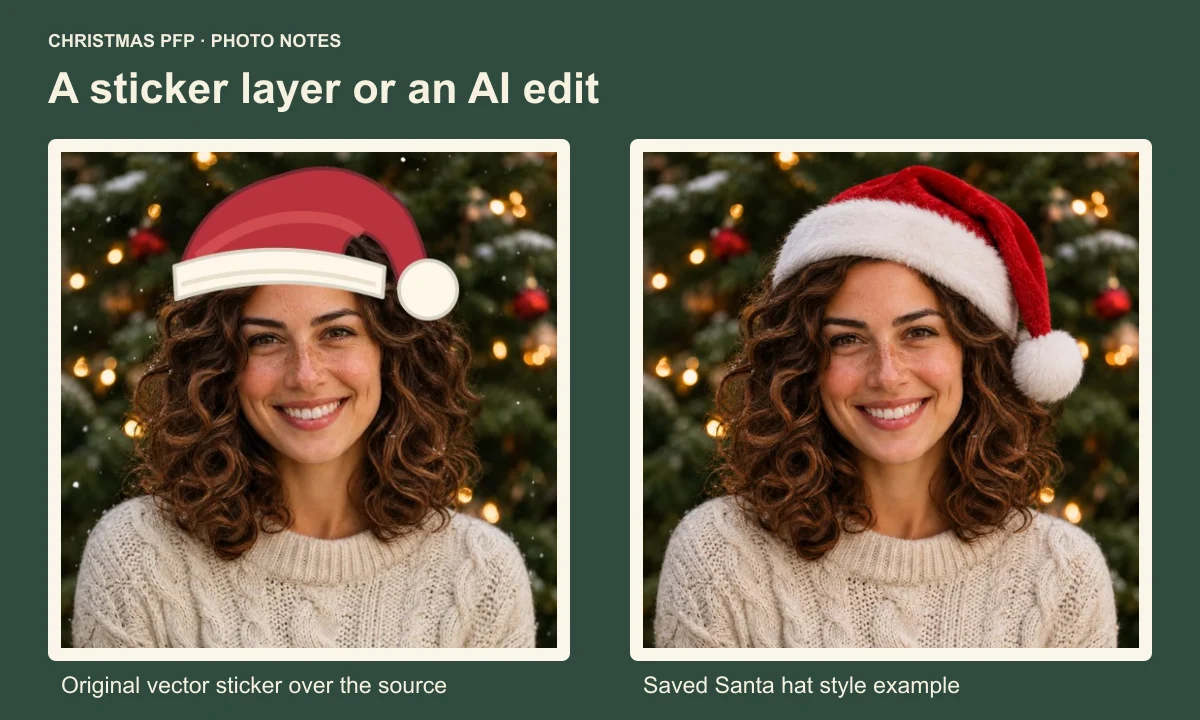
Choose a Santa hat sticker when you need to keep the photograph underneath unchanged. Choose AI editing when you want the hat rendered into the scene and are willing to inspect changes around the face, hair and background. The amount of control you need should decide the method.
For this guide, we placed an original vector hat over a fictional source portrait and compared it with a saved Santa hat AI example made from the same source. The AI example was generated on November 13, 2026, using the application's style prompt. The manual composite was made on November 15. Both methods start from the same picture, so we can inspect what each one changes.
What a sticker changes
A sticker is an extra image layer. You choose its position and size, and can rotate it to follow the head. In our composite, the hat is an original vector drawing with a red crown, pale brim and round pompom. No third-party sticker asset or licence was needed for this demonstration.
The source remains underneath that layer. Our lossless PNG check confirmed that pixels outside the sticker were unchanged. The sticker still covers part of the original hair, so keeping base pixels does not mean every part of the photo remains visible.
The result has deliberately drawn edges and a flat trim. That can suit a playful avatar. It also gives you an immediate reason to inspect the join between the brim and the hair when the original photograph has detailed curls and soft lighting.
What the AI example changes
The saved AI image gives the brim a fur-like texture and the red crown visible folds. The pompom sits beside the hair. Those details help it read as a hat worn in a photographic portrait.
The hair at the contact edge has also been reconstructed. The output is a newly generated edit, so matching the source's broad scene does not establish that the remaining pixels are identical. Compare the face and sweater yourself before accepting the image.
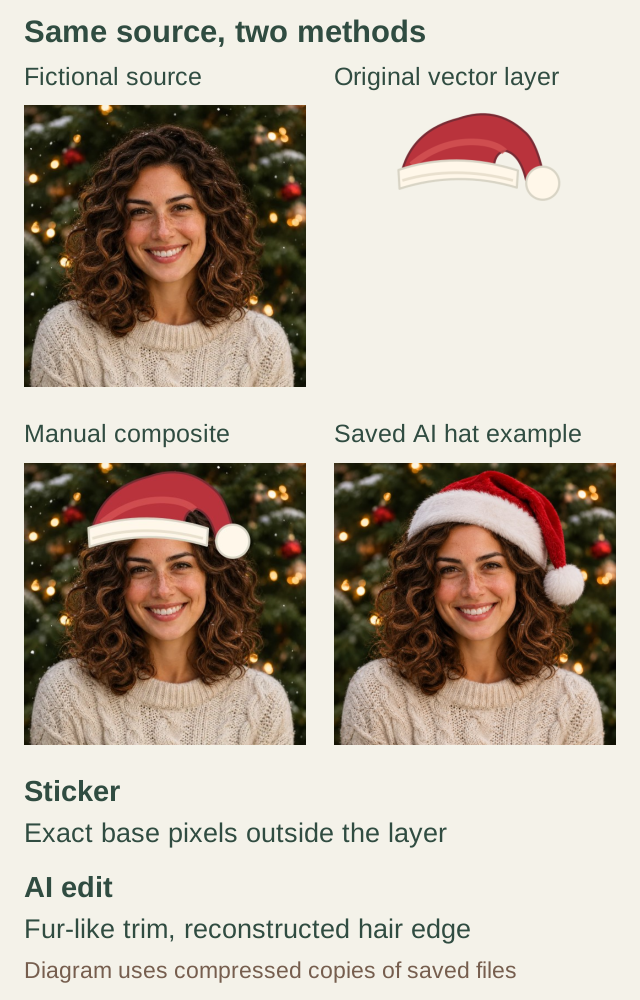
Original project sticker artwork and a saved AI example using the same fictional source. Compressed diagram copies show placement and texture; the manual pixel check used the lossless PNG.
Our diagram reproduces the files in a compact layout. The images are examples with a fictional person, and the manually drawn hat has a different shape from the AI hat. Use it to compare the editing methods. The two hats have different designs, so this is not a test of identical accessories.
Decide which control matters for this photo
If you need an exact logo, printed pattern or approved accessory design, a separate layer lets you place that specific artwork. Check that you have permission to use it. Adding a sticker also lets you return to its position later when you save an editable project.
If you want a hat that follows the head and light without drawing the contact edge yourself, AI can produce that integration. Review the result closely, since even an accessory edit can alter features you meant to leave alone.
For a portrait where a distinctive curl or a familiar expression matters, keep the original beside the result. For a pet, compare markings around the eyes and both ear outlines. The Santa hat photo guide explains the source framing that gives a hat room.
A free manual route with separate layers
Photopea offers a free browser-based route for placing a sticker manually. Its layer guide explains that layers sit above one another and can be edited separately. The steps below follow its current documentation, checked November 15, 2026; our example above was composed with an original SVG layer rather than captured from Photopea.
Open a copy of your photograph. Add a transparent hat image you are allowed to use as a separate layer. Photopea's open and save guide describes dropping a file onto the current document to insert it as a new layer.
Select the hat layer and use Free Transform to move it, resize it and turn it to match the head. Keep its aspect ratio consistent so the brim and pompom do not stretch. Confirm the transformation, then inspect the edge above the forehead and the space beside the ears.
Save an editable PSD if you want to move the sticker again. Export a PNG for the profile picture. Photopea documents those as separate save choices. Keep the original photograph outside the edited project as well.
Inspect the hat before choosing the final crop
With a sticker, zoom in to find a pale rectangle around a file that was meant to be transparent. Check whether the brim sits across the forehead at a believable angle. If hair should cross in front of the hat, a layer mask can hide the relevant part, but that adds manual work.
With AI, inspect the eyebrows, hairline and ears beside the brim. Look at the mouth as well, since the accessory is not the only part of the image worth checking. A second attempt costs another generation; save the current result before deciding whether it needs one.
Both methods can leave a pompom outside a circular display. The circle crop guide shows what disappears at the edges. Review the finished avatar small as well as enlarged.
Choose an editing route before uploading
Christmas PFP's Santa hat only option uses AI editing. It does not provide a draggable sticker layer or a manual layer editor. The Hand-drawn Christmas guide covers the larger visual change of turning the portrait into an illustration.
For the AI route, open the Santa hat style, use a clear source and compare the saved result with it. A person or pet generation costs 5 credits. Square and circle downloads of the same result do not require another generation. If keeping the underlying photo unchanged is your requirement, use a separate sticker layer and preserve the editable file.