Christmas PFP
Dogs
Christmas Dog PFPs for Pointed Ears and Floppy Ears
Frame a Christmas dog PFP with pointed or floppy ears. Compare two annotated source-photo studies and check the hat, muzzle and collar before saving.
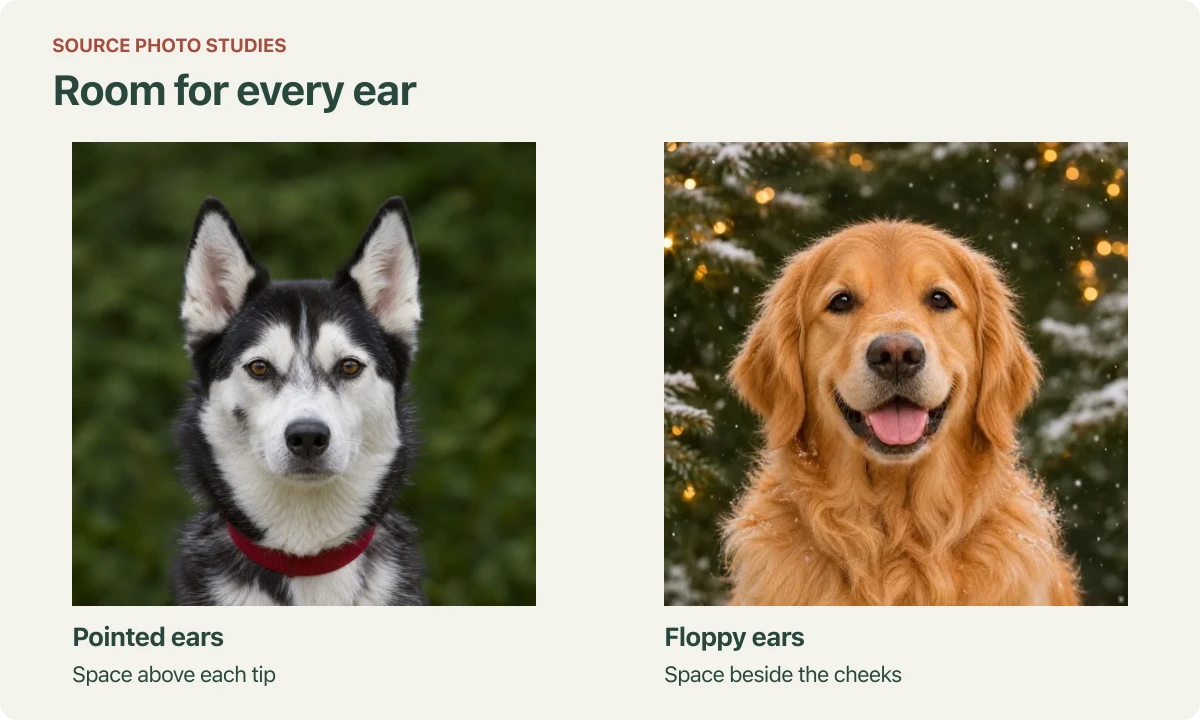
Leave room for the whole ear outline when you choose a photo for a Christmas dog PFP. Pointed ears use space above the eyes. Floppy ears can reach farther out beside the cheeks and lower down toward the neck. A close crop that suits one dog can lose a familiar part of another dog's face.
The two source-photo studies below use fictional AI-created dogs. They let us mark the ear outlines and possible headpiece space without treating an illustration as a tested edit from this website. Use them to check your own source photo before choosing a holiday look.
Give pointed ears room above the head
In the black-and-white dog study, both ear tips stand well above the forehead. The empty background above them matters as much as the visible space between them. Starting with a photograph cut off at the tips gives an editor no source detail beyond that edge.
Follow each ear from its base to its tip. Check the farther ear in a turned pose, too. An ear partly hidden behind the head can be easy to overlook when you are concentrating on the eyes. Choose another photograph if you want that outline clearly represented and the original barely shows it.
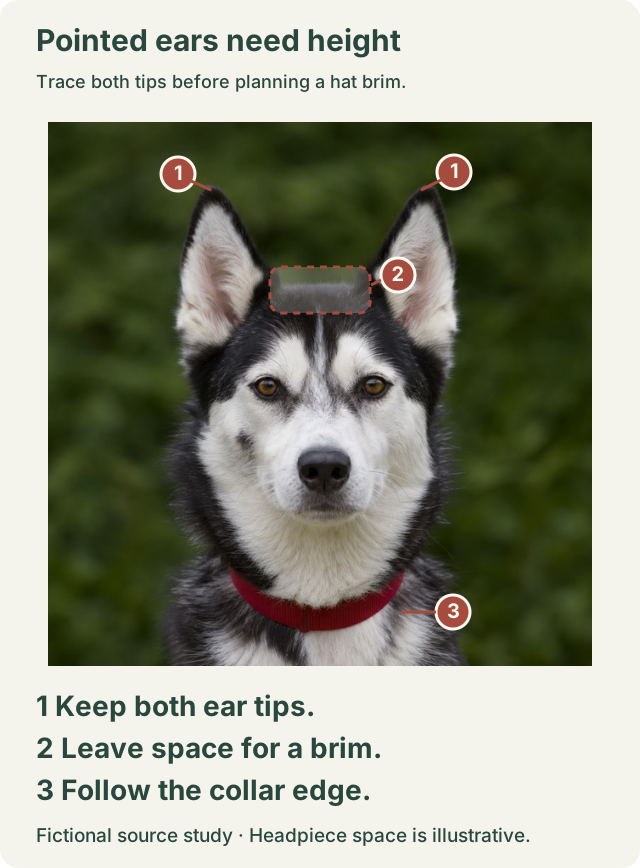
Source-photo study with a fictional AI-created dog. The outlined headpiece space is a planning aid, not a generated hat or a promised placement.
A Santa hat adds another shape above the forehead. Look for a place where a brim could sit without covering the ear bases. A large pompom can also occupy the space beside a tip. Keep enough of the original frame to judge both ears together when you compare the result.
Leave side room for floppy ears
The golden dog's ears fall alongside the cheeks. Here, cutting tightly around the face can remove the lower ends even when there is plenty of space overhead. Trace the hanging edges down toward the neck before deciding where the square should end.
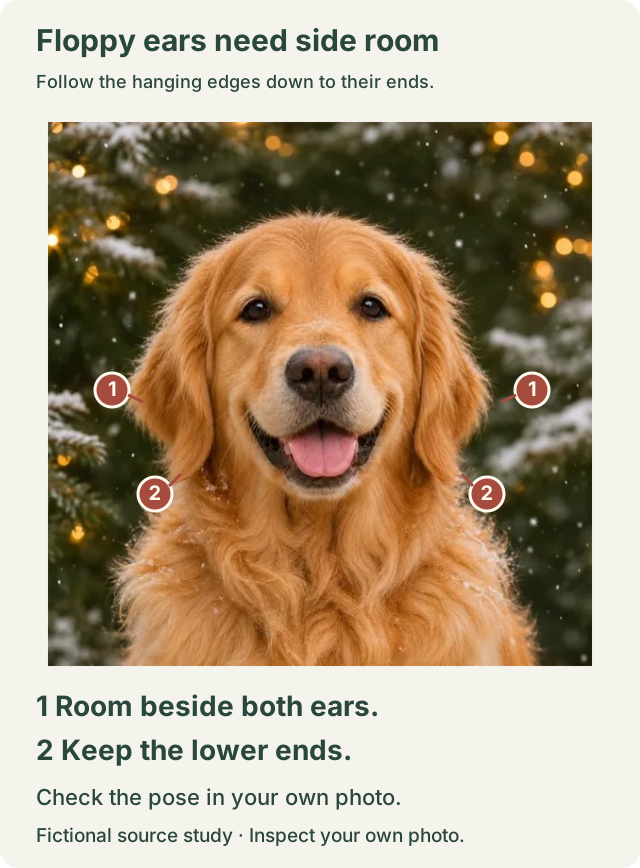
The golden dog is an existing fictional source illustration from our style examples. Annotations show what to inspect in a source photo; no new website generation was tested for this guide.
Watch the background beside those edges. Similar-colored foliage or a dark shadow can make the ear blend into the setting. In this picture, the snow and greenery create a different boundary from the dog's golden fur. Your own photo may need a little more separation to make that outline easy to follow.
Avoid choosing solely by breed name. Use the shape the dog actually has in the selected photograph, including a folded tip or one ear held differently from the other. A different expression can change which edge needs room.
Choose the hat treatment before generating
For a dog Santa hat avatar, select My pet and Santa hat only in the studio. This look asks for a headpiece in your existing scene. The preview shows the intended treatment; your source photograph determines what needs checking in the result.
Choose Holiday portraits if you want a larger change to the setting. Warm Christmas tree uses a festive portrait scene without adding a hat. That can be useful when the ears are the part of the photograph you most want to keep unobstructed. It still uses AI, so compare the ear shapes and markings afterward.
Choose between a headpiece in your scene and a new festive setting before spending credits. The pet photo guide covers the wider upload workflow; this page concentrates on choosing and checking the dog's head outline.
One pet picture costs 5 credits. The one-time pack supplies 100 credits for $5.99, with any applicable tax shown at checkout. Previewing a style example does not establish how it will fit your particular dog.
Check the eyes, muzzle and collar against the source
Keep the original photograph open when you review the finished Christmas dog profile picture. Start with the eye area, then follow the nose and muzzle markings. On the pointed-ear study, the white forehead stripe and darker cheek areas provide visible comparison points.
If a collar appears in your source, check its edge below the jaw. The pointed-ear example has a red collar that is separate from the muzzle. In your result, look for an accessory or fur change that has merged those shapes. A collar's presence alone cannot tell you whether its details stayed accurate.
Move back to the ears after looking at the face. Follow each base where it joins the head, then compare the length and fold with the source. For another kind of animal, the cat ear and whisker guide shows the extra fine outlines that deserve attention on a cat.
Reject a blurred puppy photo before uploading
For a Christmas puppy PFP, enlarge the source photograph and inspect the eyes and nose before uploading. Look for a defined eyelid edge and a nose outline you can follow. A picture can look charming at thumbnail size while those details become soft when opened larger.
Compare nearby shots from the same moment if you have them. Choose the one with the clearest face and complete ears, even if another has a more dramatic pose. Repeating a generation from a blurred source does not supply the missing original detail.
Check the circle before saving
Switch between Square and Circle on the finished preview. Check both pointed tips or both hanging ear ends, along with any hat brim and pompom. The circle crop guide explains which parts of a square disappear in a round avatar.
Keep a square PNG as your master copy. You can also download a circle PNG with transparent corners without another generation. Check the final profile preview in the app where you will use it before confirming the upload.
For TikTok, follow the static profile photo guide when you are ready to upload the saved dog picture and review its final crop.
Make a Christmas dog PFP with a clear photograph that leaves room around your dog's actual ear shape.
Pairing your own portrait with your dog? The owner and pet matching guide compares head position and accessories across two separate files.